1971 Norton Commando wiring & rewire at mono motorcycles.
Daniel Morris of mono motorcycles is no stranger to diagnostics, electrical fault finding & wiring. Therefore, he was delighted to be given the opportunity to rewire a 1971 Norton Commando.
“We had a call from a customer last month asking if we could make him a wiring loom for his 1971 Norton Commando which he has been restoring. As I love a challenge I agreed .The customer then informed me that he would be coming from Exeter!
The customer booked in & it arrived with us last week (27.09.18)Well most of it did! The Norton had loosely been re-assembled & was missing the tank, seat, exhausts & the entire loom! I was hoping the old loom would have been with the Norton, not because I wanted to use it, but it would have been a help to work out where the loom laid & what it required. Thankfully there is a plethora of information on the internet & there are many wiring loom schematics which have been uploaded.
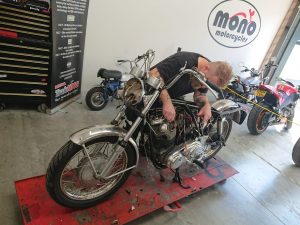
The customer booked in & it arrived with us last week (27.09.18)Well most of it did! The Norton had loosely been re-assembled & was missing the tank, seat, exhausts & the entire loom!
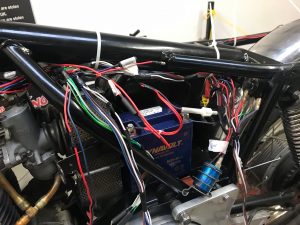
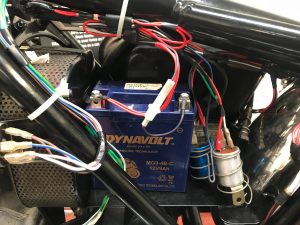
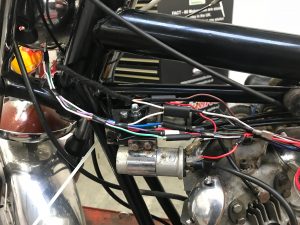
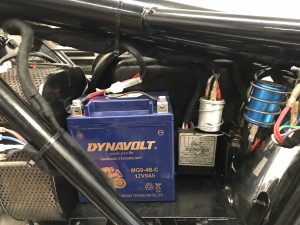
The Norton has an electronic ignition fitted, so first thing was to start there. I started by extending the wiring so the control box could sit in the battery box alongside the capacitor & the new battery.

The Norton has an electronic ignition fitted, so first thing was to start there. I started by extending the wiring so the control box could sit in the battery box alongside the capacitor & the new battery.
One thing to bare in mind with some of the classic motorcycles, is a lot run a positive earth, something that still catches me out every now & then, after working with negative earths for the past 30yrs, it’s a hard habit to break. After putting all the auxiliaries in place I started laying the wires in.
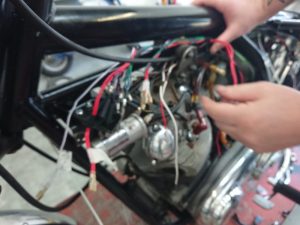
One thing to bare in mind with some of the classic motorcycles, is a lot run a positive earth, something that still catches me out every now & then, after working with negative earths for the past 30yrs, it’s a hard habit to break. After putting all the auxiliaries in place I started laying the wires in.
I always try to keep to the original wiring colours as much as is possible, to avoid confusion, aiding future work. One plus side of this build, the customer didn’t want any indicators fitting, which saved 3 wiring runs.
I always try to keep to the original wiring colours as much as is possible, to avoid confusion, aiding future work.
Once the loom was in, I loosely cable tied it in place to work out the lengths needed from each cable. I endeavour to used period correct ends where ever possible, the Norton using Lucus bullet connectors as many British cars & motorcycles did back in the day.
Once the loom was in, I loosely cable tied it in place to work out the lengths needed from each cable.
The next part of the process was to connect up the battery to test the circuits. Nearly everything worked straight away. However, the horn switch was intermittent & therefore I had to strip the switch gear down to have a look at what was going on. It transpired it was a bad connection in the switch unit.
Time to check for a spark. . . Nothing!
Taking a closer look at one of the coils I could see they are designed to run 6volt in stead of 12volts. Remembering back to my AA days, you can step the voltage up. We used to do this when we had to jump start 24v lorries. We would do this by running two 12v battery’s in series.
Taking a closer look at one of the coils I could see they are designed to run 6volt in stead of 12volts.
By wiring them in this way it is the same as running 1 big component instead of two small low output units. I tried it again & still no spark. I began to trace everything I had done, to see if there were any glaringly obvious anomalies. A quick check is to simulate the switching signal. This is easy on the electric ignition system by turning on the ignition and quickly touching the wires from the trigger. Cracking big spark!
The beautiful thing about this simple test is it’s now eliminated the rest of the system. With this in mind, it looks like it is most likely the pick up sensor, however at the time of writing this, I’ve not yet tested the sensor itself.
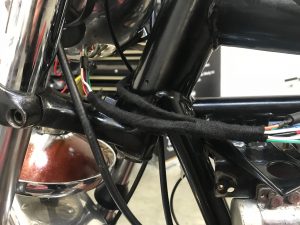
The last part of the wiring process & once we know everything works correctly, the loom is removed to tape it in period correct loom tape.
The last part of the wiring process & once we know everything works correctly, the loom is removed to tape it in period correct loom tape.
Therefore, what have we learned from this repair? Starting from scratch did add quite a few extra hours to the build. Research & working out the best way to lay the loom, took the best part of 5-6 hrs. Also, I feel going forward, when we undertake projects of this nature again, we would need to make sure the motorcycle is closer to a finished item so we can check the charging system once finished.
Therefore, what have we learned from this repair? Starting from scratch did add quite a few extra hours to the build. Research & working out the best way to lay the loom, took the best part of 5-6 hrs.
Motorcycle wiring is not a quick fix & always must be treated with care & consideration. This is especially important when starting from scratch, as each wire has to be prepped & located with absolute accuracy. If you don’t know what you are doing, you are in peril of causing an overload or at worse, burning out key components, putting your rider at risk. To assemble & fit the loom has taken a considerable amount of time, however it’s been a pleasure to learn a lot more about another British classic motorcycle.”
Daniel Morris – Proprietor & Owner of mono motorcycles.
If you have any wiring needs & would like to get in touch, please do so on 01243 576212 / 07899 654446 or through our contact page.