mono motorcycles “200” The Honda CB200 customisation story. Part 1.
“At the beginning of 2022 a customer contacted us and asked if we could build him a custom small cc lightweight bike that he could take to his holiday home in Scotland.
The customer had an old BSA C10 which he asked if we could modify and modernise with the motogadget system. Although this is possible it would be a challenge to change the 6 volt system to 12 volt as no one makes a bolt on kit for the C10. The BSA had also been in a barn for 40 years and some parts were way beyond repair.
With this in mind another donor was sourced and it could not have been more different to the C10 barn find.
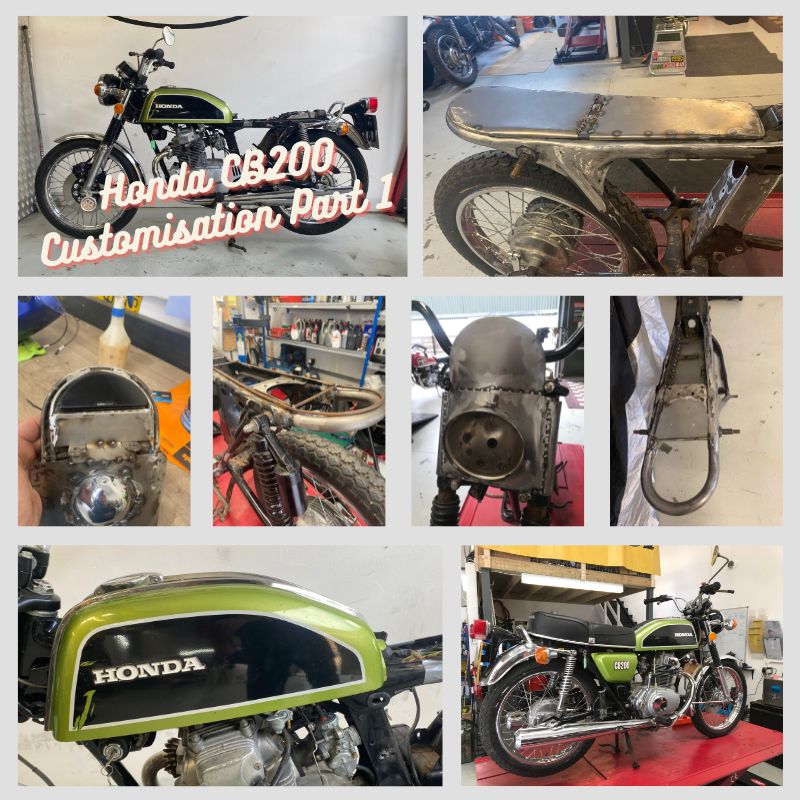
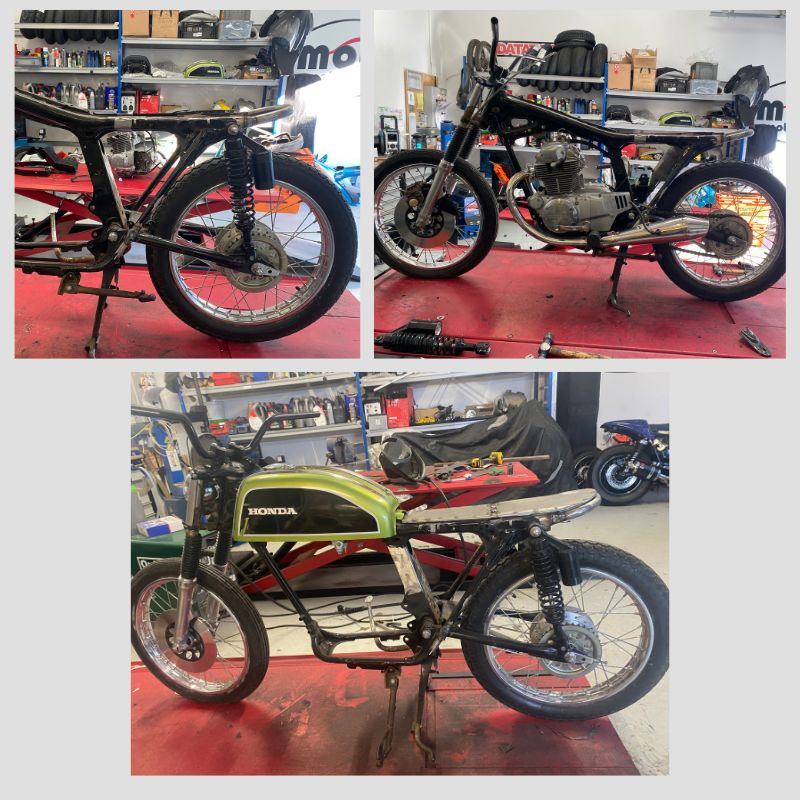
The new donor bike was a very tidy extremely low mileage 1976 Honda CB200 with only 300 miles on it! Yes, you did read that right, 300 miles in 47 years!
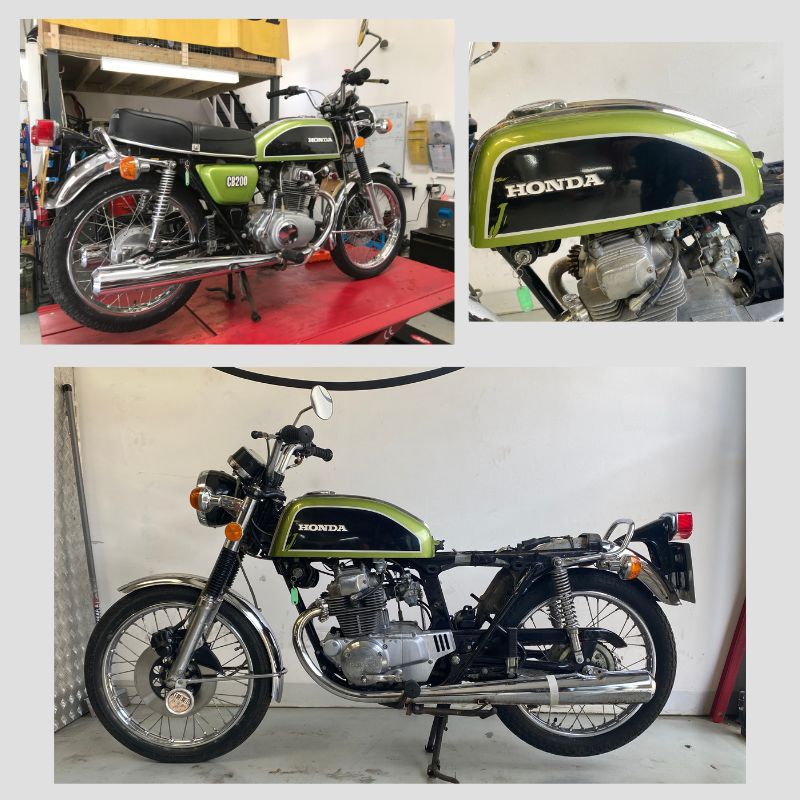
To be honest a part of me just wanted to restore this little beauty but it ticked every box for what our customer required. Small nippy, reliable, electric start and 12 volt.
Sounding like this was right up our ally, we had a few zoom meetings and design sessions with our customer and a plan was hatched. A 70s scrambler style/flat tracker design that was as happy tearing up a beach as it was cruising around the local roads.
Once the Honda was with us the first thing was to get it going. Fresh fuel, carbs cleaned, new plugs, oil & battery and it fired into life! After a few laps of the farm, it was ready for the next stage! The strip down.
When building a custom bike for yourself you may have a vision of what you like or want to achieve.
However, when the customer wants you to build a bike you need to see things through their eyes and a bit of poetic license is needed. How we go about this is to ask a lot of questions, including ideas on colour, style any unique features.
The list we had was very much along the lines of: Knobby Tyres, no polished bits, flat seat and an old style “70s” scrambler headlight, do away with the airbox & motogadget everything!
Then it was down to us to bring this vision to life.
I had a good look at Honda CB200’s which had already been customised and although I took a little inspiration from others; what I really tried to do was to look at other builds and consider what could be improved. One thing I really didn’t like on other people’s build was the battery box hanging down under the seat, that had to be improved.
The first part of the strip down in advance of modification was to drain the tank down, remove the seat, exhaust system and air box. With these bits removed we could start to plan where the electrical components would live.
I was very keen to hide as much as possible. With this in mind a 4 cell Antigravity battery was the only option, paired with a Ricks Motorsport 12 volt regulator rectifier, a motogadget m.unit also needed to be hidden along with an ignition coil, a starter solenoid, GPS sensor and a motogadget breakout box.
There was also a fair amount of room under the fuel tank and within the down tube of the frame.
The benefit of the Antigravity batteries are they can be mounted in any position. I finally settled on the battery being on its side under the seat, the m.unit being in the down tube behind the carbs and the other bits being under the fuel tank.
Before we could go any further we needed to make sure the exhaust system would fit as this needed to go off to be cerakoted with the engine.
A pair of short reverse cone silencers would suit as they would give a nice upward stance following the lines of the bike. We maintained the original Honda front pipes and tig welded a sleeve and holding bracket directly to the frame.

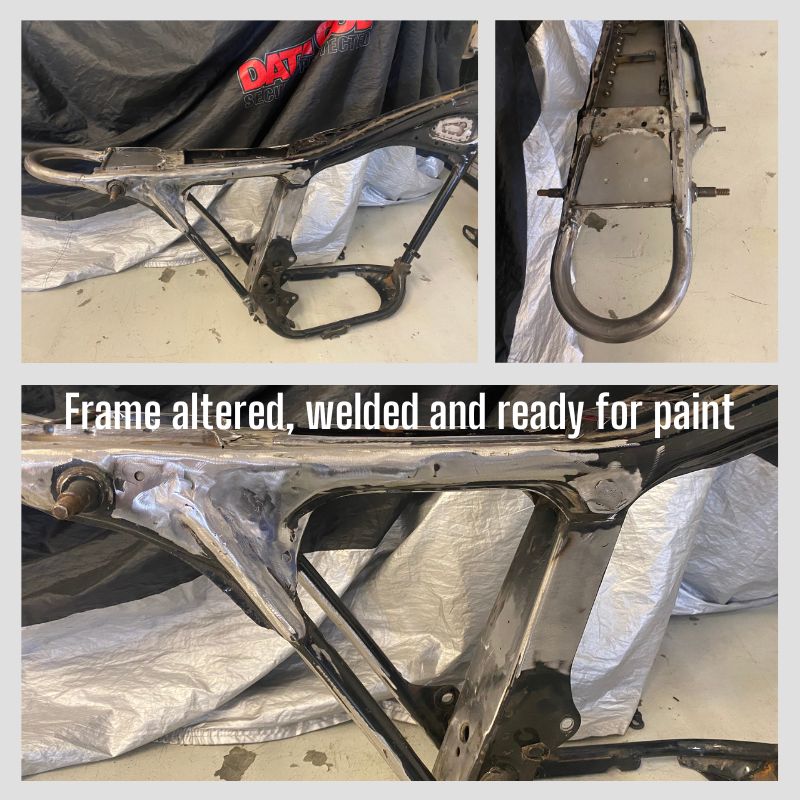
Once the exhausts were mounted the next part was to remove the unfinished frame rails now exposed after removing the seat. We then shaped a piece of 22mm pipe to form a seat rail. This had its own challenges as the frame is square at the back and we added a round hoop.
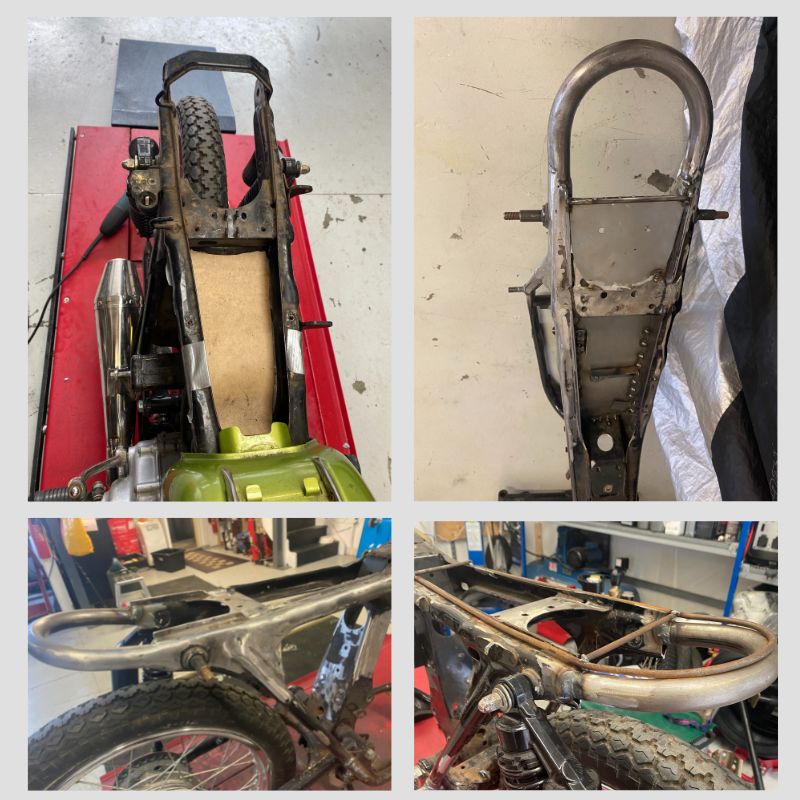
We also fitted a new pair of shock absorbers to the rear, these were slightly longer than the originals to give the scrambler look.
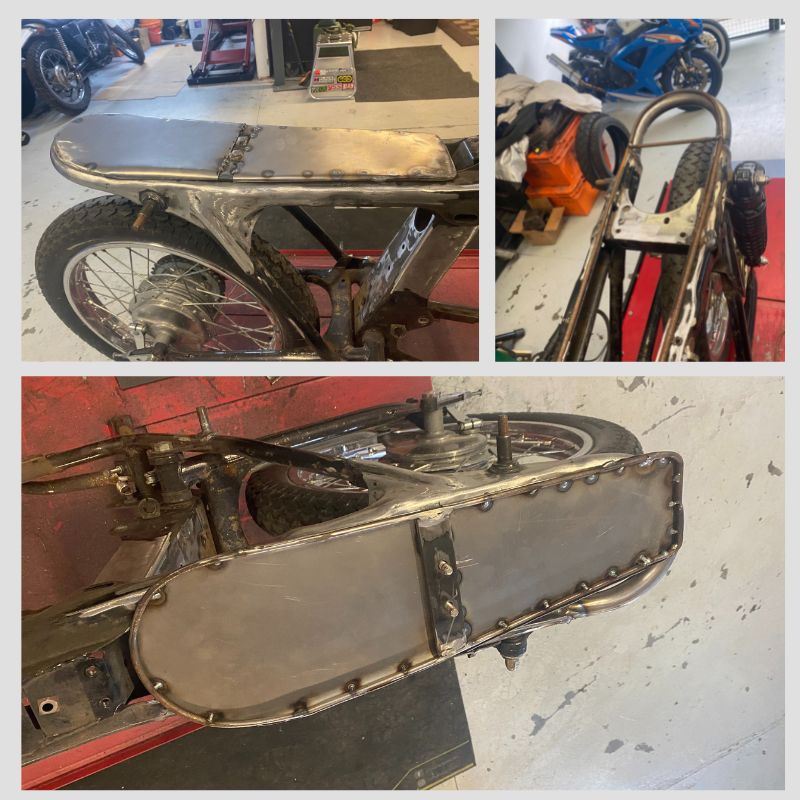
Next was time to make a seat base. This was done with some 8mm round bar which was tacked to the frame and then bent to follow the contour of the rear frame. This was then ground off and a steel base added and welded to the newly formed seat pan.
Once this was completed, we could then remove the engine and concentrate on the frame.
As the goal was to make a smooth minimalistic finish, all the brackets needed removing and holes needed welding up and grinding flat. We also needed a new battery box making which with a bit of CAD, (that’s Cardboard Aided Design to you and me!) was fairly straightforward.
Next job and the biggest challenge of them all was the headlight. Our customer had seen a bespoke headlight on a custom bike in Built magazine and asked if we could mimic the number board style design.
The first issue was trying to find a headlight small enough. Now you would think this would be fairly straightforward but in the end a 5 inch spot light was used with a duel LED bulb fitted so the bike still had high and low beam. The next task was to make a position for the motogadget motoscope pro dash to sit in.
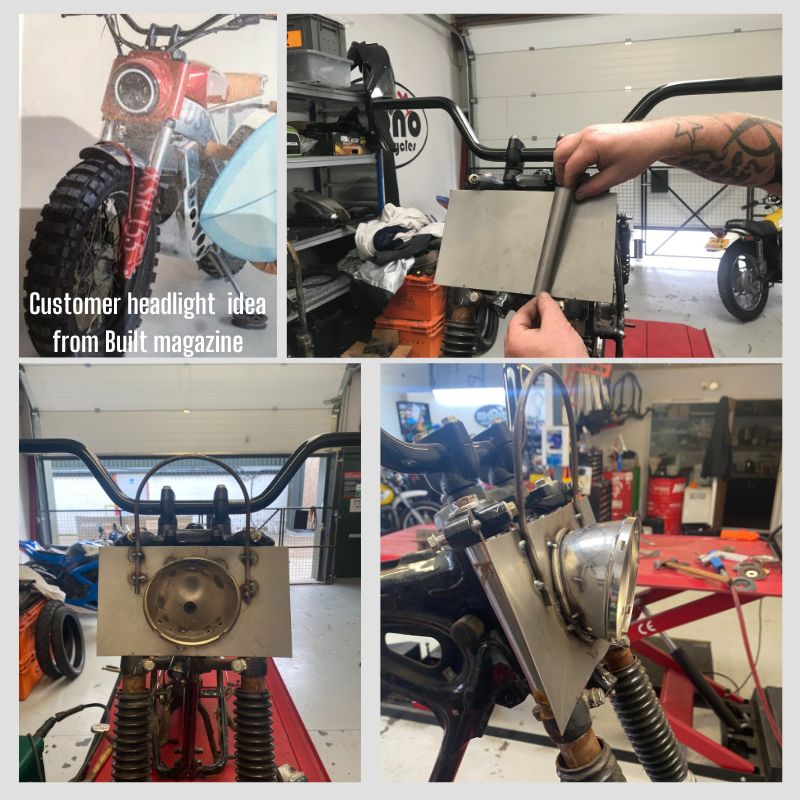
Now to me if you think 70s dirt bike the headlight fitted to the Suzuki PE and Yamaha IT had a fan shape number board above the headlight. That’s what we needed. This also meant the motoscope pro could mount in the back of it.
I started with a flat steel plate cutting a hole in it so I could mount the headlight bowl into it so it would set back as far as possible. I then used some small round bar and shaped the bar so it gave the fan shape and also made the headlight a bit more 3D.
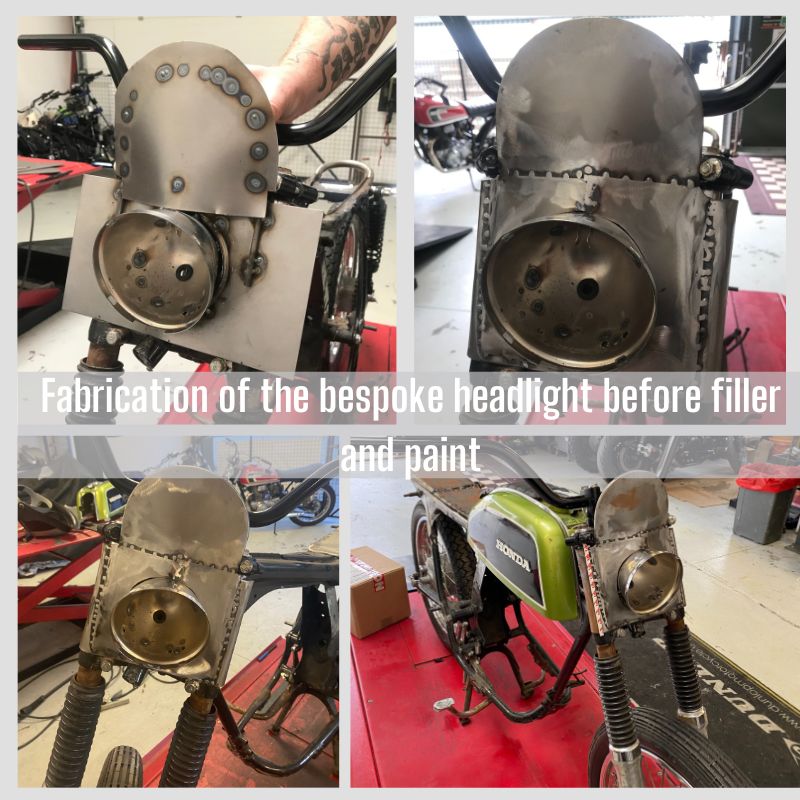
Once I was happy I then made a steel skin to go over the front. On the rear we cut a small piece of wood the same shape as the motoscope pro and bent the round bar around it forming the size and shape.

Once completed the headlight surround was skimmed with filler before heading off to paint.”
Written by Daniel Morris.
In part two of the customisation process, we will explore how we rebuilt the engine, had the wheels professionally re-spoked, the frame, tank and headlight painted, a full motogadget system installed and the final build story.
Tune in next week to find out more about the evolution of “200” the mono motorcycles Custom Honda CB200.